| Infected host | |
|---|---|
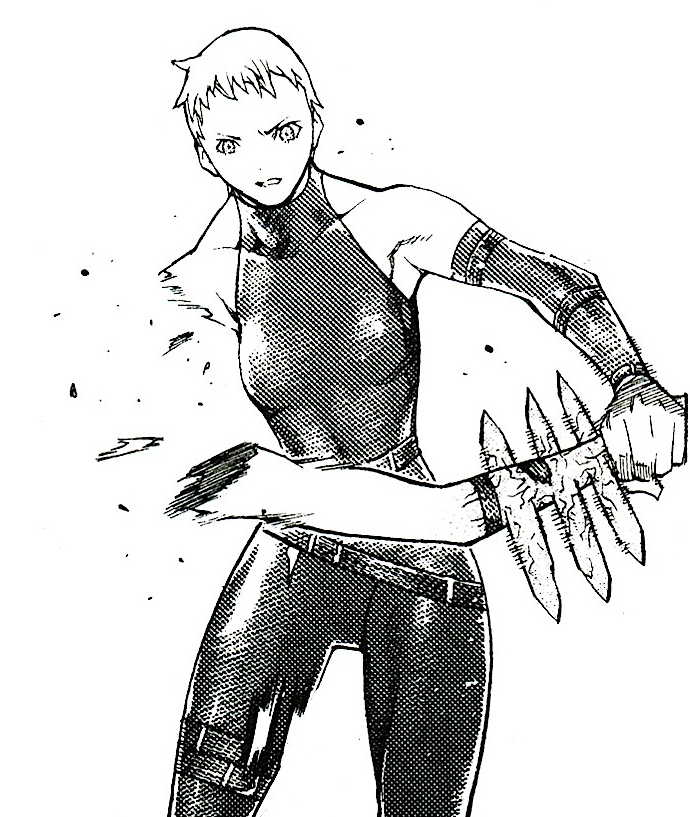 Deneve tearing off infected arm | |
|
VIZ Media name |
N/A |
|
Variant |
N/A |
|
Original Name |
N/A |
|
Current status |
Unknown |
|
Ties |
Rod, Destroyer |
|
Class |
Unknown |
|
Quote |
Don't let those things hit you! You'll get infected![1] |
|
First appearance |
|
Etymology[]
Unnamed by characters in the manga.
Appearance[]
The host can assume a variety of forms, depending on the entity infected and the stage of infection.
Datasheet[]
Class[]
Unknown type. ability based on strength baseline (shapeshifting).
Clare describes them as the rods and Hellcats as lifeless parasites needing a host to reproduce.[2]
Description[]
Life-cycle of an infected host begins in two ways—either from the Destroyer or Hellcat.
Destroyer[]
A crown-like structure extrudes from mouth of the [3] The rods are mounted like cartridges on machine-gun belt.[4] Crown fires barrage at 360 degree angle.[5]
Should rod hit living target (such as Beth),[6] rod awakens into lamprey-like creatures that further awaken and merge with host into a "Hellcat" form resembling Luciela's awakened form.[7]
Or can awaken body parts, such as arms, into a cat-like form (Dauf).
Hellcat[]
When the rods awaken into a Hellcat awakened, the Hellcat can produce rods that can infect other entities.
History[]
Destroyer[]
When Luciela x Rafaela awakens, the castle is destroyed.[8]
Clare's naked body emerges from sea of Yoma tissue. She gazes on the sky-high entity—the Destroyer—a demonic parody of twin goddesses of love, Teresa and Clare.[9]
The Destroyer forms crown of rods, resembling radiant halo of Apollo. A rod volley begins as Deneve and Helen reach Clare.[10]
Deneve[]
The rods awaken into Hellcats, which surround and attack Deneve, Helen and Clare.[11]
Deneve lands atop a Hellcat's head. Using Undine's technique of pressing down one sword with another, a head wound opens. But rods emerge from wound and strike Deneve's arm.[12]
As the rods and arm awaken together, Deneve is force to tear off her arm.[13]
Beth[]
Elsewhere, Cynthia and Yuma come upon Beth, impaled with giant rod.[14] Rod and Beth merge as they awakened together.[15] Later, awakened Beth fights Priscilla.[16]
Ticelli[]
Rods destroys town of Ticelli. Retrieval Squad finds only Raki alive, due to Priscilla leaving her arm embedded in Raki's body.[17]
Her arm prevents rods from absorbing life-energy of Raki.[18]
Priscilla[]
After destroying Alicia and Beth, Priscilla pursues scent of Teresa, whose flesh Clare contains.[19]
Dauf[]
After Priscilla kills Alicia and Beth, she finds Riful and Dauf, who are too injured to defend themselves. Priscilla kills Riful.[20]
Dauf pursues Priscilla, as she pursues Deneve, Helen and Clare. He attacks Priscilla.[21]
Dauf loses Riful's upper torso and is distracted. When Dauf glances at it, Priscilla destroys his right arm, then left. Priscilla awakens to her winged, One-horn Monster form.[22]
During the fight, Dauf's arms awaken into Hellcat-like arms that launch rods.[23]
Her memory nearly restored, she kills Dauf, then continues her pursuit of Teresa's scent.[24]
References[]
Tankōbon Claymore volumes cited are VIZ Media (en-us) editions, unless otherwise noted. Manga scenes (chapters) not yet translated cite Shueisha tankōbon (ja) editions. Manga scenes not yet published in tankōbon form cite Jump SQ (ja) editions. Fragments of Silver Omnibus (総集編 銀の断章 Gin no Danshou) 1–3, Shueisha, are only available in Japanese. Anime scenes (episodes) cited are FUNimation (en-us) editions, unless otherwise noted.
- ↑ Claymore 17, Scene 95, p. 173
- ↑ Claymore 17, Scene 95, p. 175
- ↑ Claymore 17, Scene 95, p. 147
- ↑ Claymore 17, Scene 95, p. 148
- ↑ Claymore 17, Scene 95, pp. 150–151
- ↑ Claymore 17, Scene 95, p. 190
- ↑ Claymore 18, Scene 96, pp. 25–29
- ↑ Claymore 17, Scene 93, pp. 98–99
- ↑ Claymore 17, Scene 93, pp. 108–111
- ↑ Claymore 17, Scene 94, p. 158
- ↑ Claymore 17, Scene 94, p. 159
- ↑ Claymore 17, Scene 95, pp. 167–168
- ↑ Claymore 17, Scene 95, p. 170
- ↑ Claymore 18, Scene 96, p. 20
- ↑ Claymore 18, Scene 96, pp. 23–25
- ↑ Claymore 18, Scene 96, pp. 54–55
- ↑ Claymore 19, Scene 110, p. 75
- ↑ Claymore 20, Shueisha, Scene 110, p. 77
- ↑ Claymore 18, Shueisha, Scene 99, pp. 104–105
- ↑ Claymore 18, Scene 99, p. 112–115
- ↑ Claymore 19, Scene 102, pp. 26–27
- ↑ Claymore 19, Scene 102, p. 35
- ↑ Claymore 19, Scene 102, pp. 44–45
- ↑ Claymore 19, Scene 103, pp. 60–61