| Dauf | |
|---|---|
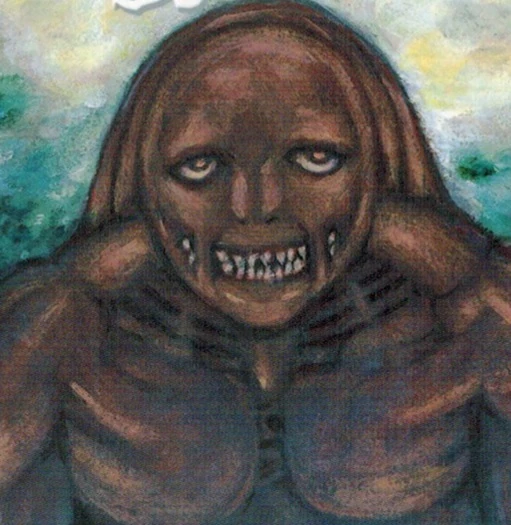 Dauf, tankōbon 18 front jacket face | |
|
VIZ Media name |
Dauf[1] (en-us |
|
Variant |
Dauf[2] (de |
|
Original name |
ダフ[8] Dufu |
|
Rank No. |
3 of Initial Male Era[9] |
|
Present status |
Awakened, killed by Priscilla |
|
Ties |
Organization, Riful |
|
Class |
Offensive[10] |
|
Technique |
Unknown |
|
Quote |
I'm gonna strip ya naked, tear off your hands and feet, rip open your belly and suck out your guts.[11] |
|
Anime voice |
Gunnar Helm (de), |
|
First appearance |
|
Etymology[]
ダフ transliterates from "Duff," an anglicized form of several proper names that ultimately derive from the Scottish-Gaelic dubh (black, dark). Possibly alluding to the inner psyche of the character. VIZ Media and FUNimation use "Dauf."
Appearance[]
Claymore[]
Physical[]
Large and muscular. Short blond hair and silver eyes. Has strong body odor.
Uniform[]
Early basic Organization uniform. A plate buckle hold 3-layer spaulders on the shoulders. Instead of the later carrier, a simple hook attached to a back plate holds the sword.[12]
Rudimentary faulds only cover the hips. Vambraces protect the forearms up to the elbow.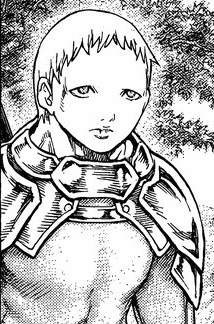
Dauf in uniform
Warriors of the Initial Male Era wear neither a dicky with a symbol, nor a cape.
Awakened[]
Human form[]
Usually shirtless, Dauf wears trousers and sabatons. In Mucha he wears a sheepskin-like vest.
Awakened[]
Normal[]
Thick-armored humanoid giant. Dauf fires veined Yoma rods from his hands, arms and mouth. A band of tissue support either side of his mouth. In colored manga illustrations Dauf is depicted as brown. In the anime he appears blue.
Infected[]
In the Lautrec sequence with Priscilla, he attacks Priscilla. He is infected by three huge, phallic-shaped rods, His eyes appear pupil-less, while his body bears serrated ridges like Luciela's Hellcat form. During the combat with Priscilla, he develops arms resembling Hellcats.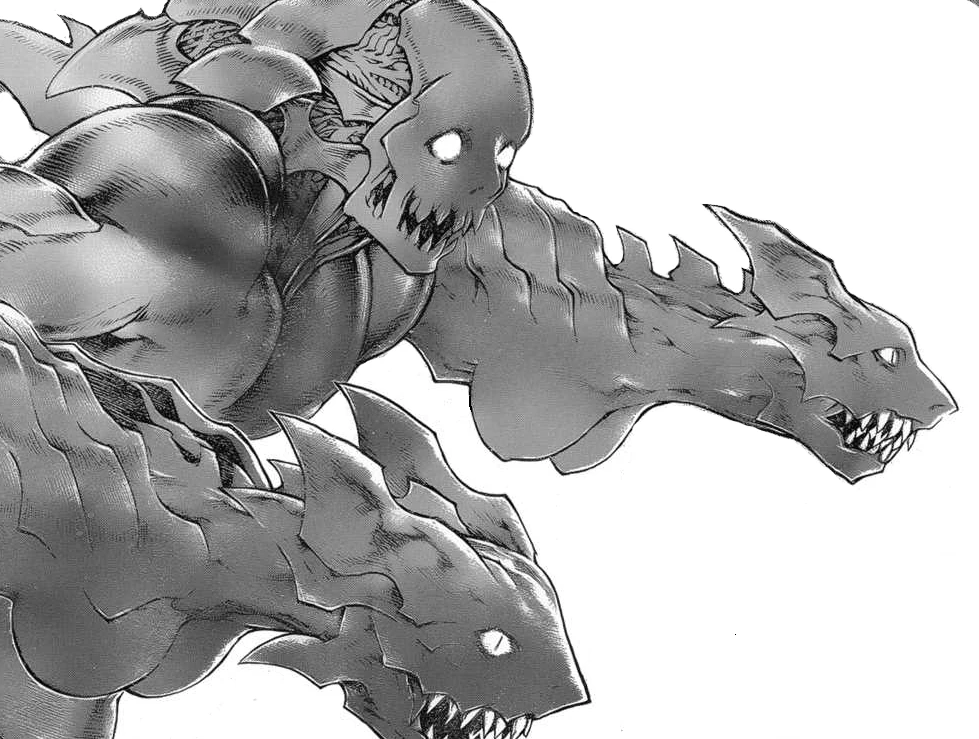
Dauf infected
Personality[]
Uncouth, irascible, with loud, arrogant speech, often punctuated with unfulfilled threats. Consort of Riful of the West. Insecure about relationship with Riful, who occasionally threatens to leave him.
Datasheet[]
From Yoma War Record II.[13]
Baseline[]
|
|
Class[]
Dauf is an offensive type[14] warrior, his specialized ability is undescribed by the Organization.
Awakened, Dauf can fire veined Yoma rods of various sizes.[15] His armor's solidity has the highest rating of all awakened Beings. Possibly due to this solidity and being an offensive type, his regeneration ability is limited.[16]
History[]
Early life unknown.
Vinci Hill[]
Meeting[]
During the Initial Male Era of Claymore warriors, Isley (No. 1), Rigaldo (No. 2) and Dauf (No. 3) meet on Vinci Hill.[17]
Isley announces that No. 4, Chronos, is the fourth single-digit to awaken.
Rigaldo realizes that all the warriors will awaken and suppressing Chronos is futile.[18] But before he awakens himself, he challenges Isley to a sword-fight, as he never accepted the No. 2 rank given by the Organization.[19]
Interloper[]
But before Isley and Rigaldo can fight, a young female warriors appears.[20] She introduces herself as Riful. Caught unaware, Rigaldo puts away his sword and leaves, as does Isley. Dauf is left alone with Riful.[21]
New friend[]
Dauf is smitten by Riful.[22] When he offers his hand in friendship, she refuses and says that Dauf needs to bathe. This embarrasses Dauf. Riful is already dominating Dauf.[23]
Witch's Maw[]
In abandoned castle, Riful, from her throne, supervises Dauf in awakening members of Zakol hunt, Jean and Katea. After Katea awakens, Dauf tests her power, but finds her too weak. Riful orders Katea destroyed, despite awakening 29 previous subjects.[24]
Dauf senses Clare's arrival. Riful orders him to deal with Clare.[25]
Round I[]
Upstairs, Clare destroys Yoma pack.[26] Dauf bursts through floor. Clare attacks Dauf, who captures her. Then Galatea arrives.[27]
Round II[]
Using Yoma Energy Alignment and Control, Galatea makes Dauf drop Clare into her waiting arms.[28] Galatea tries to leave. But Dauf caves-in entrance. But all his rods miss Galatea. In the ensuing battle, Galatea cuts off Dauf's hand.[29]

Dauf attacks
Riful appears and couches Dauf on circumventing Galatea's technique.[30]
To break the stalemate, Galatea orders Clare to retrieve Jean, while she holds off Dauf.[31]
Round III[]
Clare discovers Jean awakened butterfly form. Clare uses Galatea's technique to revert Jean to normal.[32]
Upstairs, Galatea is exhausted, but Clare and Jean arrive in time. Galatea and Clare distract Dauf, while Jean attacks his throat with Drill Sword. In the ensuing battle, Dauf slams Galatea and Clare together, then strikes down Jean, but losing most of his fingers.[33]
Round IV[]
Clare asks Jean to try once more. This time, Clare's Quicksword—guided by Preemptive Sensing—prevents Dauf from slamming his arms together on the warriors.
Jean bores through Dauf's throat.[34] But Riful stops Jean from beheading Dauf. Riful addresses Galatea and Clare: "You held me off and didn't break, despite my efforts." Then she rewards Galatea and Clare by giving back Jean.
One mistranslation has Riful speaking to Dauf instead: "Someone like you who can accept me without breaking." Mistranslation repeated in English dub of anime.
Riful awards the warriors their freedom.[35]
Northern Army[]
Riful and Dauf kill 12 members of the Northern Army. But this is misdirection by Isley.[36]
When Riful and Dauf go to Mucha to support Luciela, they arrive too late. Luciela is defeated and dead. When Riful meets Isley and Priscilla, she orders a retreat.[37] But Riful finds the merged sisters and brings them back to Lautrec.[38]
But Riful recovers Luciela x Rafaela. But to awaken the entity, she needs someone skilled in Yoma Power sensing.[39]
7-year timeskip[]
Witch's Maw II[]
Dauf helps Riful in forcing Renée to awaken Luciela x Rafaela.[40]
Baited by Rubel, Clare, Cynthia and Yuma search for Renée and Rafaela. In forest, they encounter Dauf, who grabs Yuma's leg—Clare cuts it off. While Cynthia regenerates Yuma's leg, Clare follows Dauf into Witch's Maw II. Fight inside castle results. But Clare escapes.[41]
Renée takes suppressant and flees. Dauf tries to pursue her, but she loses him. While Riful and Dauf are distracted by Renée, Clare reenters castle.[42]
Destroyer[]
At a safe distance, Riful and Dauf watch the Destroyer rise sky-high. Dauf urges Riful not to engage Destroyer. Riful and Dauf are attacked by Abyss Feeders,[43] then Alicia and Beth.[44]
During the 3-way combat, the Destroyer fires a volley of rods, hitting all three parties. In the confusion Riful retreats, dragging along Dauf. He asks that she abandon him, so she can flee to safety.[45]
Priscilla[]
After defeating Alicia and Beth, Priscilla finds Riful and Dauf, who are too injured to defend themselves. Priscilla feeds on both.[46] But Dauf survives and gives in to infection of rods, allowing him to regenerate at the cost of his consciousness.[47]
Dauf pursues Priscilla, as she pursues Deneve, Helen and Clare. He attacks Priscilla. But during the fight, Riful's upper torso slips from his hand. When Dauf glances at it, Priscilla destroys his right arm, then left. When Priscilla regains her memory, she kills Dauf.[48]
References[]
Tankōbon Claymore volumes cited are VIZ Media (en-us) editions, unless otherwise noted. Manga scenes (chapters) not yet translated cite Shueisha tankōbon (ja) editions. Manga scenes not yet published in tankōbon form cite Jump SQ (ja) editions. Fragments of Silver Omnibus (総集編 銀の断章 Gin no Danshou) 1–3, Shueisha, are only available in Japanese. Anime scenes (episodes) cited are FUNimation (en-us) editions, unless otherwise noted.
- ↑ Claymore 8, Scene 42, p. 90
- ↑ Claymore 8, Tokyopop, Scene 42, p. 90
- ↑ Claymore 8, Ediciones Glénat España, Scene 42, p. 90
- ↑ Claymore 8, Glénat Editions, Scene 42, p. 90
- ↑ Claymore 8, Star Comics, Scene 42, p. 86
- ↑ Claymore 8, Culturecom, Scene 42, p. 90
- ↑ Claymore 8, Ever Glory, Scene 42, p. 90
- ↑ Claymore 8, Shueisha, Scene 44, p. 100
- ↑ Fragments of Silver Omnibus 3, "Yoma War Record III," p. 731
- ↑ Fragments of Silver Omnibus 3, "Yoma War Record III," p. 731
- ↑ Claymore 8, Scene 44, p. 145
- ↑ Jump SQ 19, May 2012, Special Scene, p. 420
- ↑ Fragments of Silver Omnibus 2, "Yoma War Record II," p. 692
- ↑ Fragments of Silver Omnibus 3, "Yoma War Record III," p. 731
- ↑ Claymore 8, Scene 43–Scene 49, pp. 128–147; Claymore, Anime Scene 16
- ↑ Claymore 9, Scene 47, p. 65
- ↑ Jump SQ 19, May 2012, Claymore, Special Scene, p. 420
- ↑ Jump SQ 19, May 2012, Claymore, Special Scene, p. 420
- ↑ Jump SQ 19, May 2012, Claymore, Special Scene, pp. 421–422
- ↑ Jump SQ 19, May 2012, Claymore, Special Scene, p. 422
- ↑ Jump SQ 19, May 2012, Claymore, Special Scene, p. 423–424
- ↑ Jump SQ 19, May 2012, Claymore, Special Scene, p. 425
- ↑ Jump SQ 19, May 2012, Claymore, Special Scene, p. 426
- ↑ Claymore 8, Scene 41, p. 96; Claymore, Anime Scene 16
- ↑ Claymore 8, Scene 42, p. 100; Claymore, Anime Scene 16
- ↑ Claymore 8, Scene 43, pp. 106–108; Claymore, Anime Scene 16
- ↑ Claymore 8, Scene 43, p. 132; Claymore, Anime Scene 16
- ↑ Claymore 8, Scene 44, p. 136; Claymore, Anime Scene 16
- ↑ Claymore 8, Scene 44, p. 155; Claymore, Anime Scene 16
- ↑ Claymore 8, Scene 45, pp. 159–160; Claymore, Anime Scene 16
- ↑ Claymore 9, Scene 46, pp. 21–22; Claymore, Anime Scene 16
- ↑ Claymore 9, Scene 46–Scene 47, pp. 30–38; Claymore, Anime Scene 16–Anime Scene 17
- ↑ Claymore 9, Scene 46, pp. 61–63; Claymore,Anime Scene 17
- ↑ Claymore 9, Scene 48, p. 93; Claymore, Anime Scene 17
- ↑ Claymore 9, Scene 49, p. 110; Claymore, Anime Scene 17
- ↑ Claymore 11, Scene 62, pp. 150–153
- ↑ Claymore 13, Scene 82, pp. 50–57
- ↑ Claymore 13, Scene 82, p. 61
- ↑ Claymore 15, Scene 82, p. 143
- ↑ Claymore 16, Scene 83, pp. 18
- ↑ Claymore 17, Scene 90, pp. 20–50
- ↑ Claymore 17, Scene 91, p. 61
- ↑ Claymore 17, Scene 93, p. 117
- ↑ Claymore 17, Scene 94, p. 132
- ↑ Claymore 17, Scene 95, p. 180
- ↑ Claymore 18, Scene 99, p. 112–115
- ↑ Claymore 19, Scene 102, p. 30–33
- ↑ Claymore 19, Scene 103, pp. 60–61