| Destroyer | |
|---|---|
 "Twin goddesses" | |
|
VIZ Media name |
Destroyer[1] |
|
Variant |
Name: Beserker[2] |
|
Original name |
破壊者[7] hakai-sha |
|
Rank No. |
1 and 2 of the Old Generation (Luciela Era) |
|
Current status |
Phase VII |
|
Ties |
Organization |
|
Class |
Offensive: unknown ability |
|
Quote |
That is no longer Rafaela nor Luciela...It's...the Destroyer.[8] |
|
First appearance |
Scene 93 (Twin Godddesses phase) |
 Destroyer—7 phases ↓
- I. Luciela x Rafaela
- II. Twin goddesses
- Rod ↓
- Hellcat
- Infected host
- III. Mass being
- IV. Mass being + Clare
- V. Cocoon
- VI. Destroyer–Priscilla
- VII. Destroyer–Riful's daughter


Etymology[]
Scanlation origin[]
Unnamed by characters in original Japanese text. This entity is given a variety of names in translations, usually a synonym of "destroyer."
Originally a scanlation invention, "Destroyer" as a proper name is now used by VIZ Media.
Clare[]
Clare first describes the entity as a 破壊者 in generic sense of "vandal" or "breaker"[9]
Clare's second "use" of "destroyer" is actually "broken," not "destroyer" or "destroyed."[10] Clare's original dialog (ラファエラとルシエラの融合体から吐き出された破壊する者の断片だ) can be translated as "From the fused Rafaela and Luciela, fragments were broken and expelled."[11]
What Clare is saying that the "breaker"—the fused Rafaela and Luciela—is "breaking" up fragments of itself from within, then expelling these fragments, which appear in the form of rods.
Appearance[]
Various forms. Begins as two merged sisters, one a Creature of the Abyss, the other a Claymore warrior.
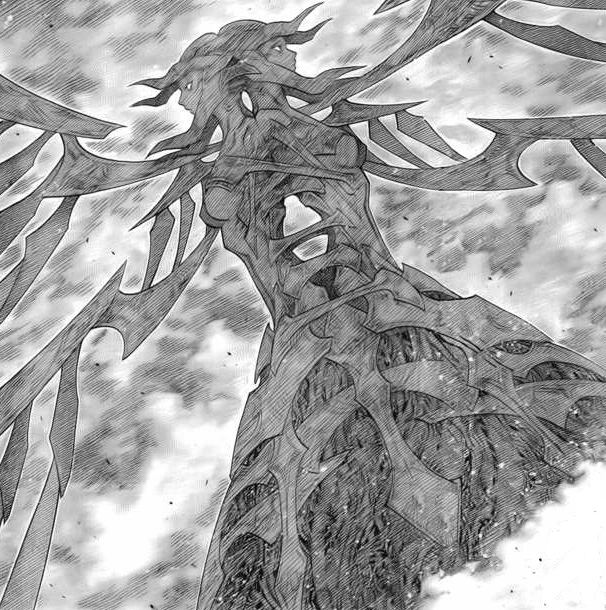
Then it awakens as a skyscraper structure with four skeleton wings resembling the radio antennae. Similar to Teresa and Clare, twin Goddesses of Love. Winged figure motif may derive from Norihiro Yagi's Angel Densetsu.
Later changes into a mass of Yoma energy, which contracts into a cocoon.
Datasheet[]
Class[]
Both Luciela and Rafaela are of the offensive type.[12] Having no Organization datasheet in the "Yoma War Record," the ability and baselines of the Destroyer itself are unknown.
Appears to have high strength (shapeshifting) and Yoma power baselines.
Deneve senses the Destroyer to be more powerful than the Abyssal Ones.[13]
Ability[]
Rod[]
Crown-like structure extrudes from the mouth. The rods are mounted like cartridges on a machine-gun belt. The crown fires barrages at a 360 degree angle.
Fan-reader phrase "parasitic rod" may allude to the parasitic rods of the Yagi antenna.
Yoma energy mass[]
The Destroyer has the shapeshifting ability to flood the surrounding environment with Yoma energy and tissue. The Yoma energy mass takes the form of demonic, female humanoid shapes.[14]
Technique[]
Techniques are unnamed by the characters.
History[]
The Destroyer has 7 phases:
- Phase I: Luciela x Rafaela
- Phase II: Twin goddesses
- Phase III: Mass being
- Phase IV: Mass being + Clare
- Phase V: Cocoon—Destroyer + Clare + Priscilla
- Phase VI: Destroyer–Priscilla—binary entity
- Phase VII: Destroyer–Riful's daughter—binary entity
Phase I[]
Luciela x Rafaela[]
After 7-year timeskip, Riful captures Renée near Doga.[15]
Renée regains consciousness. She hangs from ceiling of castle cellar. Her right arm is missing. Below sits Riful.[16]
Renée sees both her legs severed—she screams. Riful offers to let Renée reattach her limbs if she cooperates. Dauf drags in a strange object. He raises it in front of Renée.[17] It is the merged sisters, Luciela x Rafaela.
Danger[]
Renée demands that she be allowed to reattach her limbs, before probing Luciela x Rafaela.[18]
As Renée reattaches her limbs, she probes the entity. Renée finds life fragments of someone. But when she touches it, an explosion hurls her back into the physical world.[19]
She realizes the entity must never awaken.[20]
Lacroix[]
In Lacroix village, Clare and Cynthia fight a female awakened, while Yuma knocks unconscious an Organization search and rescue team. The awakened is killed.[21] But Rubel witnesses everything. Later in a private meeting, Cynthia realizes that Rubel is a mole for the Dragons' allies.[22]
Witch's Maw II[]
Baited by Rubel, the warriors search for Renée and Rafaela. In a Lautrec forest, they encounter Dauf, who grabs Yuma's leg—but Clare cuts it off.[23] While Cynthia regenerates Yuma's leg, Clare follows Dauf into Witch's Maw II. A fight inside the castle results. But Clare escapes.[24]
During the commotion, Renée takes a suppressant pill and flees. Dauf tries to pursue her, but she loses him. Riful destroys the forest and presumably Renée. While Riful and Dauf are distracted, Clare reenters the castle.[25]
Dream world[]
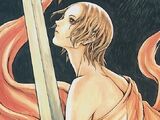
Clare enters the mind of Luciela x Rafaela. In a dream world, Clare and Jean meet Rafaela in a replay of Scene 50.[26]
When Clare reaches out to Jean, Jean is gone. Rafaela attacks and kills Clare. But Clare wakes from dream within dream. Switching from Windcutter to Quicksword, Clare kills Rafaela with Ilena's arm. Rafaela gives Clare all her memories, among which is "something you must know."[27]
Phase II[]
Awakening[]
When the merged sisters awakens, the castle bursts apart.[28]
Clare's naked body emerges from mass of Yoma tissue. She gazes on sky-high entity—the Destroyer—a demonic parody of twin goddesses of love, Teresa and Clare.[29]
The goddess Destroyer forms crown of rods, resembling radiant halo of the Roman god Apollo.[30] A 180 degree barrage of rods begins as Deneve and Helen reach Clare.[31]
Hellcats[]
The mewing rods morph into Hellcats, which attack Clare, Deneve and Helen.[32]
Deneve, Helen and Clare counterattack. One Hellcat shoots rods into Deneve's arm. The rods prove parasitic—they absorb the life of any living thing they touch.[33]
When one Hellcat fires a barrage of Rods, Clare ricochets the rods back to the source.[34]
Hellcats surround the warriors, bringing back memories of Pieta.[35]
Clare[]
Between rod volleys, Priscilla finds the source of Teresa's scent. Clare confronts Priscilla for first time since Clare's childhood.[36] Clare is ready to abandon friends and her humanity to avenge Teresa's death.[37]
But Jean's mental "block" prevents Clare from awakening, causing her attacks to fail. Deneve and Helen grab Clare and flee Priscilla.[38]
Dauf[]
Deneve decides to seek refuge with the Destroyer. .[39]
Dauf intercepts Priscilla. But she defeats him. Her memory nearly restored, she continues her pursuit.[40]
Phase III[]
Mass entity[]
While pursuing the warriors, Priscilla is hit with tentacles from the Destroyer. Priscilla then attacks the Destroyer with her own tentacles. The Destroyer crumbles apart, only to reveal its true form—a Yoma energy mass of demonic female shapes, swallowing all life it touches.[41]
Phase IV[]
Controlling the Destroyer[]
Deneve and Helen fight Priscilla, but Clare takes control of the Destroyer. Priscilla is struck by tentacles. She disintegrates Destroyer, Priscilla too gets swallowed.[42]
Deneve notes that the Destroyer can be entered and controlled, as Clare does when using Destroyer to attack Priscilla.[43]
Phase V[]
Return to Holy City[]
Ghosts bring back the cocoon to Rabona. As Galatea probes the cocoon, she realizes that releasing Clare means releasing Priscilla.[44]
Clare emerges[]
Raki[]
On seeing the Awakened emerging from the Yoma cocoon, Raki blurts out Priscilla's name. When Helen questions him, Raki only says the Awakened resembles someone he knows.[45]
Galatea cannot detect Clare's aura and sees little hope of pulling out Clare. But Raki approaches the cocoon, despite Galatea's warning. Deneve defends Raki's decision.
When Raki lays on hands and speaks to the cocoon, tentacles pierce his body. Galatea calls for help, but Raki says the cocoon is only probing his body. The tentacles soon withdraw.[46]
A section of the cocoon crumbles and out comes Clare.[47]
Friends rejoined[]
After Deneve sews up Clare's stigma, the Ghosts look on as Raki hugs a tearful Clare with all his might.[48]
Phase VI[]
Binary entity[]
Chronos notes the odd behavior of Priscilla, ignoring the easy targets among the Claymore warriors and the humans in the city.[49]
Chronos warns Lars to evade. Tentacles explode from Priscilla's position, hitting some of the spectators, who awaken into a myriad of forms.[50] One female Awakened shrivels up as life force is drained from her body.[51]
Chronos now realizes that the "attack" on the awakeneds is unintentional. A new binary "entity," made up of the Destroyer and Priscilla, are resuming their combat fought elsewhere. But now the spectators are caught up in the maelstrom and becoming collateral damage.[52]
Phase VII[]
Riful's daughter[]
Destroyer–Priscilla combats Riful's daughter. Priscilla is temporarily defeated, but escapes the grip of Riful's daughter. Priscilla rejoins her near-severed head and vomits out the remains of the Destroyer.[53]
Priscilla thanks Riful's daughter for helping to expel the Destroyer.[54]
Endless energy[]
In a perpetual cycle of destruction and creation, the combatants continually damage each other then regenerate. Riful's daughter has overcome her energy limit by tapping into the remnants of the Destroyer. Priscilla begins to realize this herself, as does Rubel.[55]
References[]
Tankōbon Claymore volumes cited are VIZ Media (en-us) editions, unless otherwise noted. Manga scenes (chapters) not yet translated cite Shueisha tankōbon (ja) editions. Manga scenes not yet published in tankōbon form cite Jump SQ (ja) editions. Fragments of Silver Omnibus (総集編 銀の断章 Gin no Danshou) 1–3, Shueisha, are only available in Japanese. Anime scenes (episodes) cited are FUNimation (en-us) editions, unless otherwise noted.
- ↑ Claymore 17, Scene 94, p. 146
- ↑ Claymore 17, Tokyopop, Scene 94, p. 146
- ↑ Claymore 17, Ediciones Glénat España, Scene 94, p. 146
- ↑ Claymore 17, Glénat Édition Française, Scene 94, p. 146
- ↑ Claymore 17, Star Comics, Scene 94, p. 142
- ↑ Claymore 17, Scene 93, p. 99
- ↑ Claymore 17, Shueisha, Scene 94, p. 146
- ↑ Claymore 19, Scene 94, p. 146
- ↑ Claymore 17, Scene 94, p. 146
- ↑ Claymore 17, Scene 95, p. 175
- ↑ Claymore 17, Shueisha, Scene 95, p. 175
- ↑ Fragment of Silver Omnibus 3, "Yoma War Record III," p. 731
- ↑ Claymore 17, Scene 93, p. 112
- ↑ Claymore 19, Scene 104, pp. 80–81
- ↑ Claymore 15, Scene 81, p. 131
- ↑ Claymore 15, Scene 82, p. 135
- ↑ Claymore 15, Scene 82, pp. 139–142
- ↑ Claymore 16, Scene 84, p. 15
- ↑ Claymore 16, Scene 84, pp. 20–24
- ↑ Claymore 16, Scene 84, p. 24
- ↑ Claymore 15, Scene 83, pp. 181–193
- ↑ Claymore 16, Scene 84, p. 32
- ↑ Claymore 17, Scene 90, pp. 20–31
- ↑ Claymore 17, Scene 91, pp. 39—50
- ↑ Claymore 17, Scene 91, pp. 48–63
- ↑ Claymore 9, Scene 50, p. 65
- ↑ Claymore 17, Scene 92, p. 89
- ↑ Claymore 17, Scene 93, pp. 98–99
- ↑ Claymore 17, Scene 93, p. 108
- ↑ Claymore 17, Scene 94, p. 148
- ↑ Claymore 17, Scene 94, pp. 150–151
- ↑ Claymore 17, Scene 95, pp. 161–163
- ↑ Claymore 17, Scene 95, pp. 168–170
- ↑ Claymore 17, Scene 95, p. 173
- ↑ Claymore 17, Scene 95, p. 178
- ↑ Claymore 18, Scene 99, pp. 124–125
- ↑ Claymore 18, Scene 100, pp. 150–151
- ↑ Claymore 18, Scene 101, p. 177
- ↑ Claymore 19, Scene 103, p. 40
- ↑ Claymore 19, Scene 103, pp. 60–61
- ↑ Claymore 19, Scene 104, pp. 74–83
- ↑ Claymore 19, Scene 105, p. 125
- ↑ Claymore 19, Scene 105, p. 125
- ↑ Claymore 20, Scene 109, p. 50
- ↑ Jump SQ, September 2012, Claymore, Scene 129, pp. 634–637
- ↑ Jump SQ, September 2012, Claymore, Scene 129, pp. 640–644
- ↑ Jump SQ, September 2012, Claymore, Scene 129, pp. 647–650
- ↑ Jump SQ, September 2012, Claymore, Scene 129, pp. 651–659
- ↑ Jump SQ, October 2012, Claymore, Scene 130, p. 412
- ↑ Jump SQ, October 2012, Claymore, Scene 130, pp. 413–419
- ↑ Jump SQ, October 2012, Claymore, Scene 130, pp. 419–420
- ↑ Jump SQ, October 2012, Claymore, Scene 130, p. 421
- ↑ Jump SQ, March 2013, Claymore, Scene 135, pp. 309–314
- ↑ Jump SQ, March 2013, Claymore, Scene 135, p. 315
- ↑ Jump SQ, June 2013, Claymore, Scene 138, pp. 674–677


All items (14)


